The insider’s guide to proper monitoring of a fleet of IoT devices
 |
Our device monitoring expert Peter Grzybowski aka “Merlin” shares his in-depth knowledge of device monitoring best practices and innovative approaches. |
1. Introduction to proper IoT device fleet monitoring
As the sheer number of IoT devices, their computational power, functionalities,
and reach to critical infrastructure continues to explode, their security becomes a paramount concern. But how will an IoT solution owner know that something may be wrong and how would they raise an alarm if something is not right? Let's try to see how we can use Mender to address this challenge to monitor the security of an IoT device fleet.
Close your eyes and imagine the world around 30 years ago: the Linux kernel was just born, Isaac Asimov was not long dead, the Olympic games in Barcelona had just begun, and HTTP was barely old enough to walk. Now open your eyes and pick up a device no bigger than your hand and enjoy streaming live video and audio to the other end of the world, and then open a Remote Terminal from the Mender web UI and connect to your device five thousand miles away in the middle of a distant ocean.
Consider the technological progress during any thirty years in the nineteenth century, and then do the same with any time period of the same length before the year 1521 AD. When I think about this, I find the times we live in stranger than fiction.
Device security monitoring and alerting
We are experiencing an unprecedented acceleration of technological development. Sometimes growth is faster than exponential, sometimes it feels like exponent of exponent. The proliferation of connected devices in recent years is part of the phenomena. Unfortunately, the increasing pervasiveness of technology brings new threats and dangers. More powerful devices means more complex applications, which in turn means greater access to data, more customers, more users, more points of access, and more dependencies. All this means that there are more places to check and monitor for security vulnerabilities and breaches. At some point in the development of an IoT project there comes a time when you just can't log in to every device and check this-and-that. Not only because there are too many of them, but also because there may be no easy access point. At the same time you have to know what happens with the devices. It is no longer enough to be sure that the device works. The paradigm of "Device is online" becomes as important as "device is secure".
What should you look out for?
Let's assume that somewhere on the other side of the world you have a device running Linux. If we look at it from the operating system point of view, there are a number of items to check when it comes to security monitoring. In the following sections we will focus on some of the most common ones which we can use as indicators that someone or something is tampering with your fleet. We will first briefly discuss the general scenarios and then provide a possible implementation with Mender Enterprise.
Open ports
IoT devices are usually not very fond of listening; in normal situations, or most common cases, there should be a very limited number of open, bound, and listening ports on external IP addresses. For Mender-controlled devices the required and sufficient number of such ports is 0. Any unexpected TCP port that is in a listening mode is probably spelling a problem, and you will want to know as soon as possible what process is responsible for opening it. In this case you would need as input a list of known open ports with the name of the processes and path to the executable; anything not on this whitelist is a cause of a security alert.
Set-uid executables
Most users would expect to find a limited number of executables that have setuid on exec bit set. Similarly to the case of open ports, you should expect a finite, closed, and not a large set of well known executables paths and names that we know have the bit on. Any sudden appearance of a set-uid executable in a given list of locations (assuming that you allow execution only from certain places) should raise suspicion and an alert.
High data transfers
There is a large number of use cases, where we expect the outgoing or incoming (or both) bytes transferred per second to be next to nothing (e.g. transfer of the order of magnitude of 1 kilobyte per day). Especially when the network uplink is more expensive than my car, I would appreciate an alert slightly before I see the bill from the satellite telecom company! You can imagine a certain threshold of bytes transferred in an hour, above which you should treat a device as being in a critical state.
Executable changing location
Usually in one life cycle of a software version on a device, you should not expect the core executables to change location and the files themselves to change at all. For instance your cherished /usr/bin/mender-connect executable should not change unless you have explicitly upgraded it. It should also occupy the same inode, until the next deployment of the new software to the device. Any executable from a given list that does not match the expected inode and sha256sum should raise serious concerns.

Network access point change
There are cases when you know exactly to what access point a device connects to. The fact that it all of a sudden changed an SSID on a wireless interface can be a sign of trouble ahead.
Process ID change
Assuming you have a long-running application on your device, it is probably unusual that it restarts on Thursday unexpectedly and without your knowledge. It may mean that someone is trying to exploit some weakness. It also may be that this someone does not expect we can monitor the process id (PID) change, and as PIDs never change during the lifetime of a process, and chances that the new pid would be the same as the old one are next to impossible, we can assume that the new pid means there was a restart.
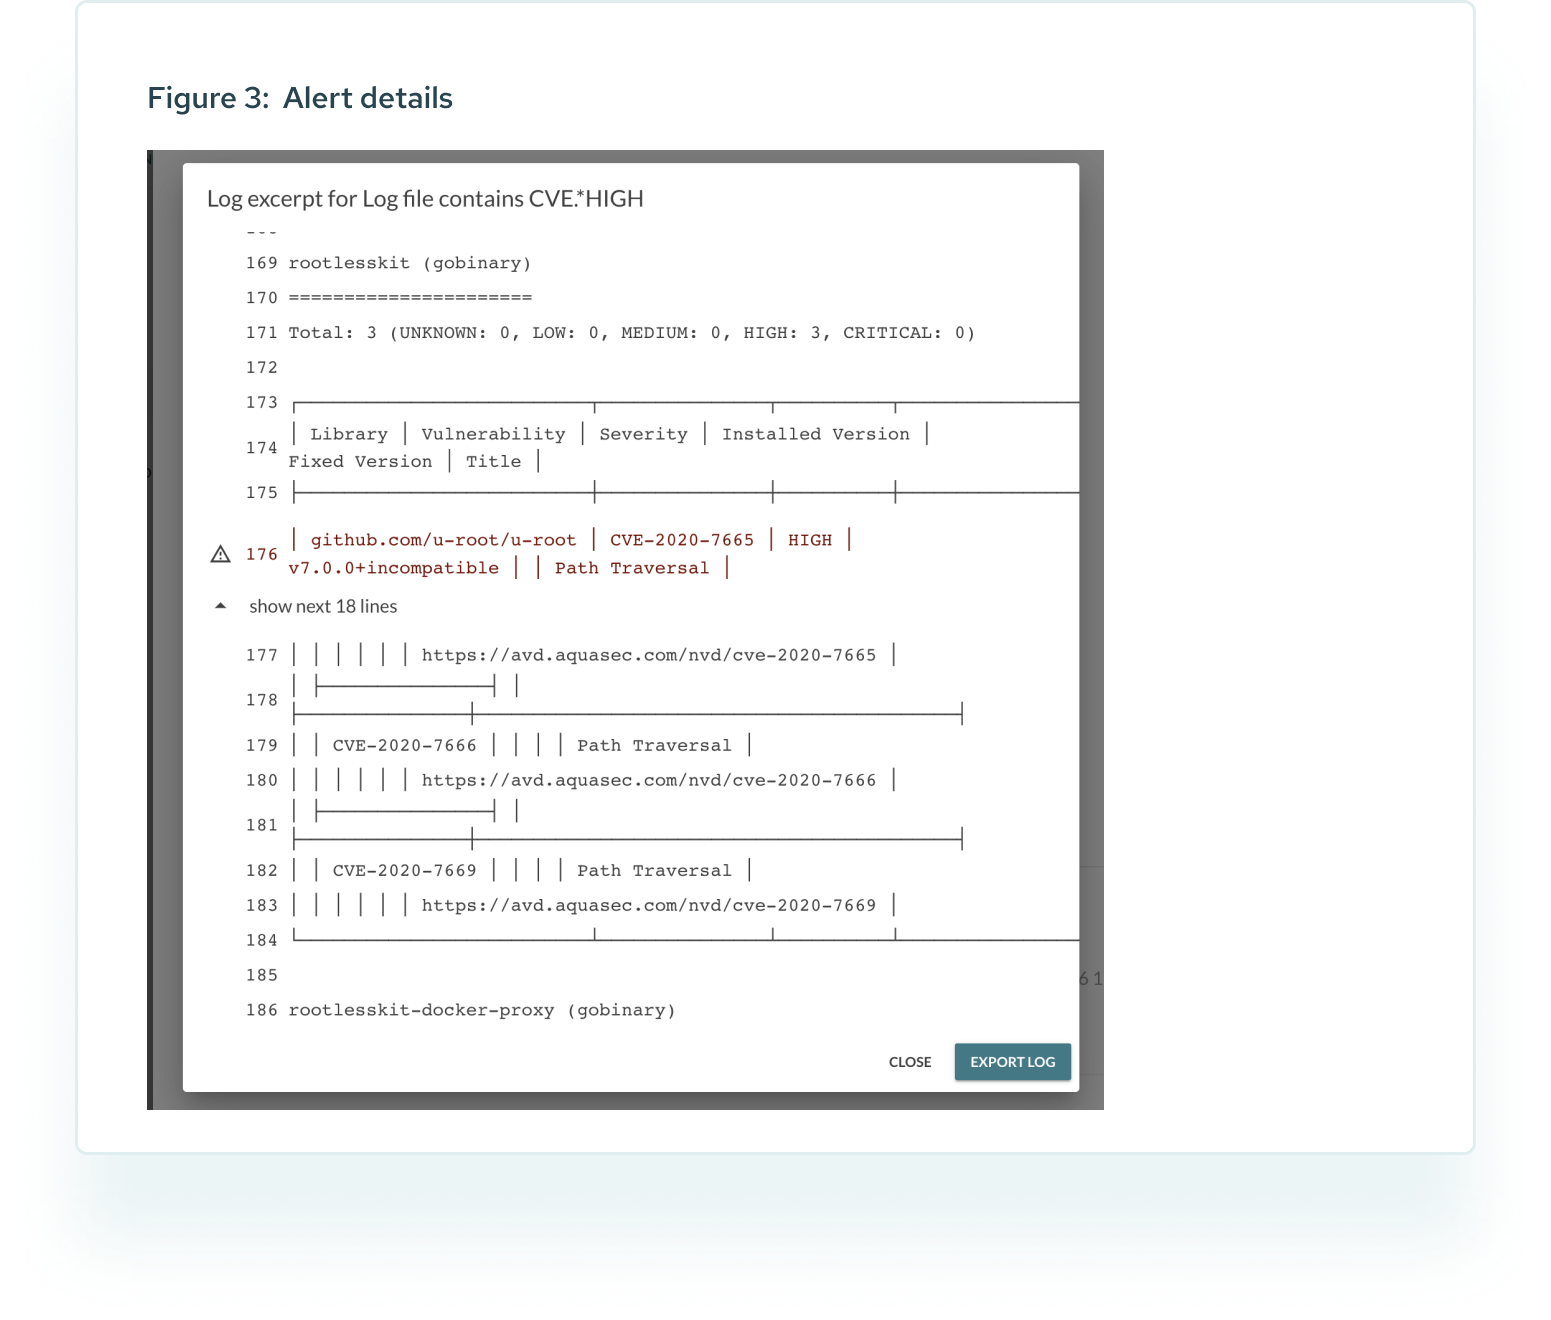
Periodical automatic vulnerability scans
Last but certainly not least, all the above checks maybe in an ok state, and yet still your device may have serious problems. What if recent deployment introduced a critical vulnerability: an executable that contains in this version a well known security hole? The only way to uncover that vector is to perform an active scan from inside the device. Fortunately we can perform such scans, parse the output and raise alerts if need be.
Configuration of monitoring and alerting
The above list of security monitoring scenarios is by far not a complete one. But even without extending it any further, the amount of things to check and configure in order to get the desired alerts is quite long.
The question arises:
How to configure the monitoring, generation and delivery of alerts, and how to do it at scale?
Mender can address this.
2. How to monitor IoT devices
Mender offers an add-on to allow you to monitor services and log files. Mender Monitor works by executing enabled checks, triggering, and delivering alerts directly to the Mender Server, and from there to Mender users who have sufficient permissions. It can do much more than just check if the daemon is running, and it is this "much more" that we are going to use now to implement the security monitoring and alerting.
Log system
A key feature of Mender Monitor is the ability to raise alarms when a given data contains a pattern. Originally used to parse log files, it is perfectly capable of streaming any command stdout, and reacting to the lines that match certain patterns. Keep in mind that it is easy to extend Mender Monitor and integrate it with your own systems much more tightly than what we present here. We will also base most of the checks on a simple case, which we can summarize as follows:
where is a name of your choice, "CVE.*HIGH" is the pattern we are looking for in /tmp/results-scan, and means that the alert will be called off after two days. We will also and as needed swap the file path with a command to get the data from arbitrary source:
It is @ as a first character in the fifth argument to mender-monitorctl that marks the rest of the string as a command which Mender Monitor will run, and which stdin will be parsed and checked against the pattern (fourth argument). All we have to do is to implement /usr/local/bin/pid-change in a smart way.
For further reading and more examples please consult the log subsystem section. All we need to know now is that whether the pattern matches the data stream (either from a file or a command), Mender Monitor will issue an alert, and once it reaches the server it will turn into UI notification in the device details and on the devices list, and if you have not disabled the email notifications in the settings, into an email to all the Mender users of your tenant who have access to the device.
Security monitoring
In the following sections we describe how to address all the above security monitoring cases with Mender. We start with general configuration for all the checks. And since to this end we use Mender Configure add-on, we will briefly describe it first. Then we present a way to pass the scan settings to a device using Mender and conclude
with an example implementation. Please keep in mind that we show the simplest possible solutions. You can extend and tailor all of it to your needs and your ecosystem surrounding Mender, not only by introducing extra parameters and security checks, but also using API: everything we show you can do programmatically.
3. A highly secure and efficient way to pass configuration data to an IoT device
The Mender Configure add-on is a simple yet quite extensible mechanism serving as an entry point for passing configuration data to a device. As such it is a good fit to deliver the settings for the security monitoring. We will now explain how it can be used to deploy a complete configuration.
Configuration with Mender
For our purpose, let's assume we have decided we will use the following json file:
The structure and keys of the above correspond to the monitoring scenarios. The names are self- explanatory, e.g.: "fileX", "inodeX", "sha256sumX" set the values for the executable changing location case. Mender Configure does not support complex data structures, so we have to add an integer to the identifiers in order to simulate arrays. It will not add a lot of complexity, as you will soon see. We can send the above configuration data to a device via Mender UI or API. In this case we will use the latter. The following script triggers the configuration push to a device (confpush.sh):
where you need to provide the device id, path to the data file (the json one above), and the authorization token which you got with the login. This is one part of the configuration management. What remains is to manage the support of the above on a device. To this end we need to get one more script, which may look as follows (scan-config.sh), and has to be present in /usr/lib/mender-configure/apply-device-config.d/ :
When you run confpush.sh the device will automatically receive the configuration deployment and will pass the json payload to scan-config.sh , which will translate it into something that Mender Monitor can easily understand; in the above it is the /etc/mender-monitor/scan.conf file which can look as follows:
At this point we have a configuration file in a suitable format to source from shell scripts. We also have a portable, scalable method to deliver the settings to a device, which is integrated into OTA software updates of Mender.

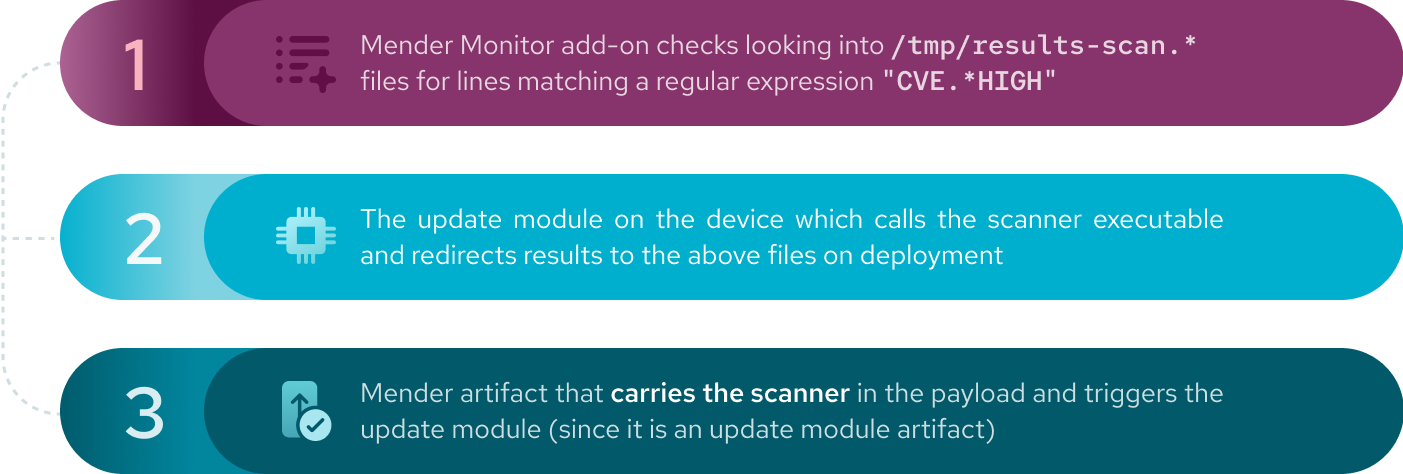
Recipe 1: security scan
For the sake of the present section and to scan the operating system from inside the device we need an external tool. One option is Trivy. Currently, we assume that you have downloaded it for your platform (below we also assume RaspberryPi4, so you need an ARM version.) Of course the same will work with any other scanner, with slight modification of the arguments.
We are going to use the so-called update module artifact. It carries a custom payload and requires custom handling on a device. It is still a regular Mender artifact, and comes with all the according benefits and maximum flexibility: the client releases as much control over the deployment as possible to us. To create the artifact we need to run:
where -f trivy assumes that trivy executable is present in the current directory, the device type is RaspberryPi4, the output file is /tmp/scan-06-06-2022.mender , and the name of the artifact is scan-trivy-06-06-2022. You can change all of those, keep in mind though, that Mender will refuse to deploy artifacts of the same name once the device has it already. The -T scan has to match the update module on a device, and creating it is the next step. We need to create the scan file in /usr/share/mender/modules/v3 It can look as follows:
It is not very complicated; it runs the scan and saves the results in a file in the directory. The final touch is to create a Mender Monitor check in order to get alerts related to the scan with the following command:
At this point, we have in place
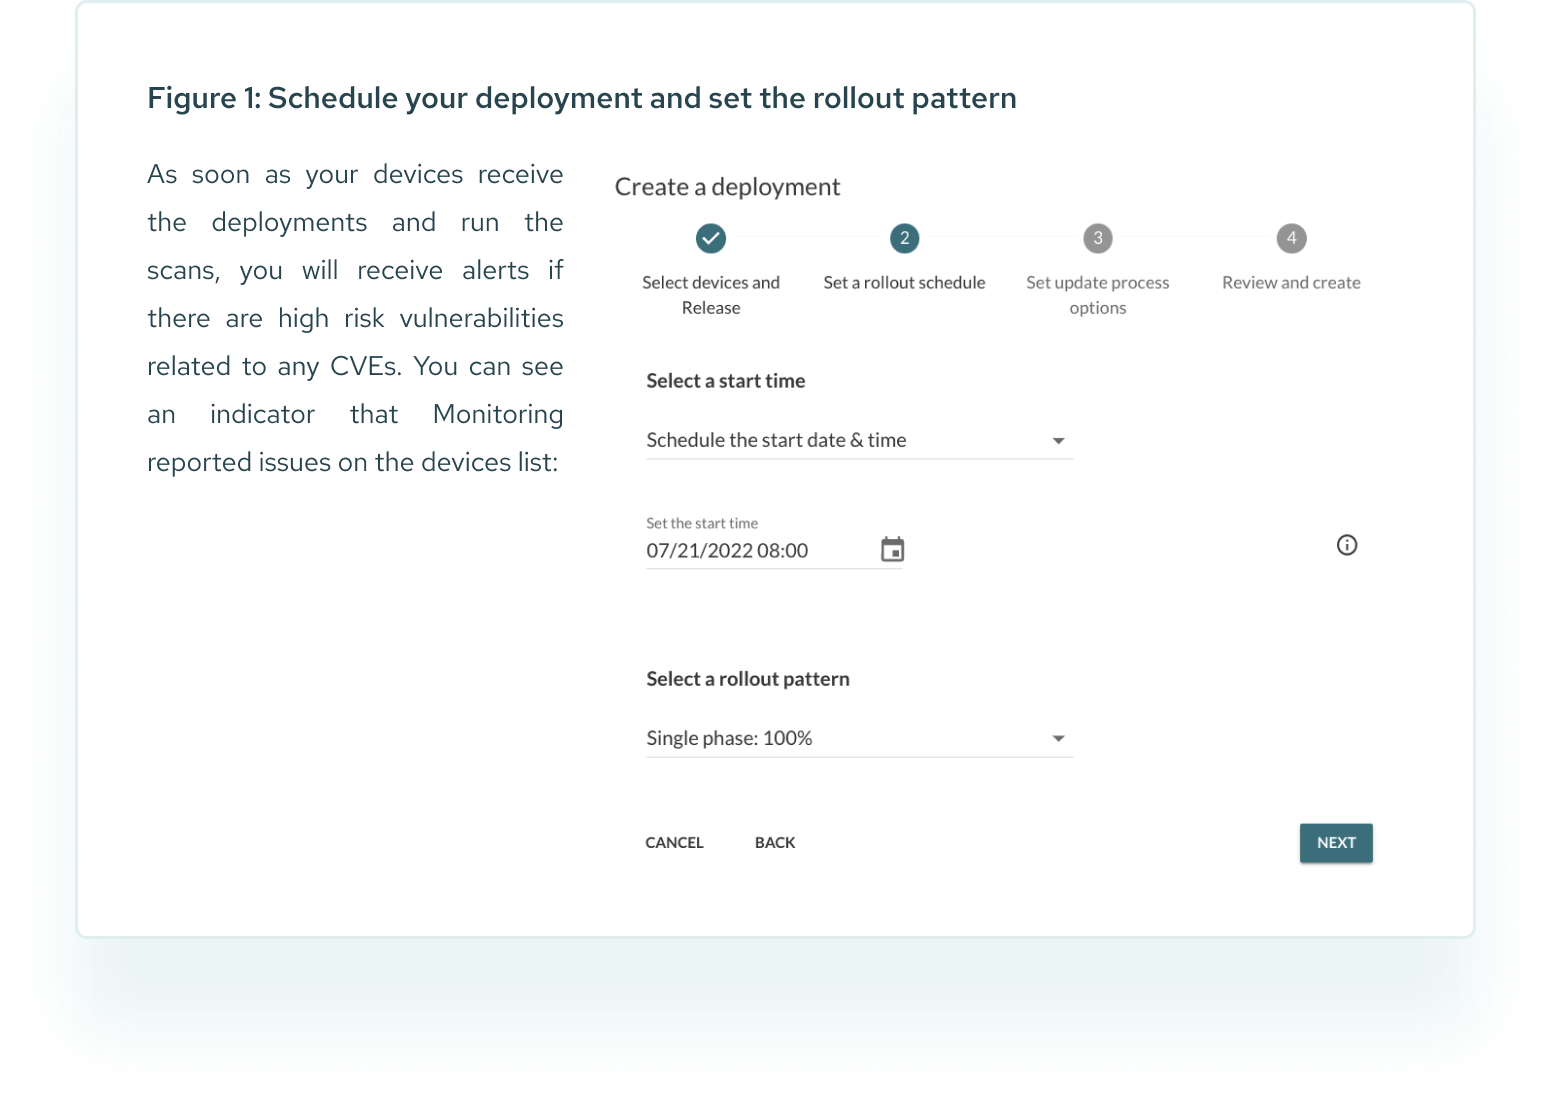
Final step: trigger the deployment
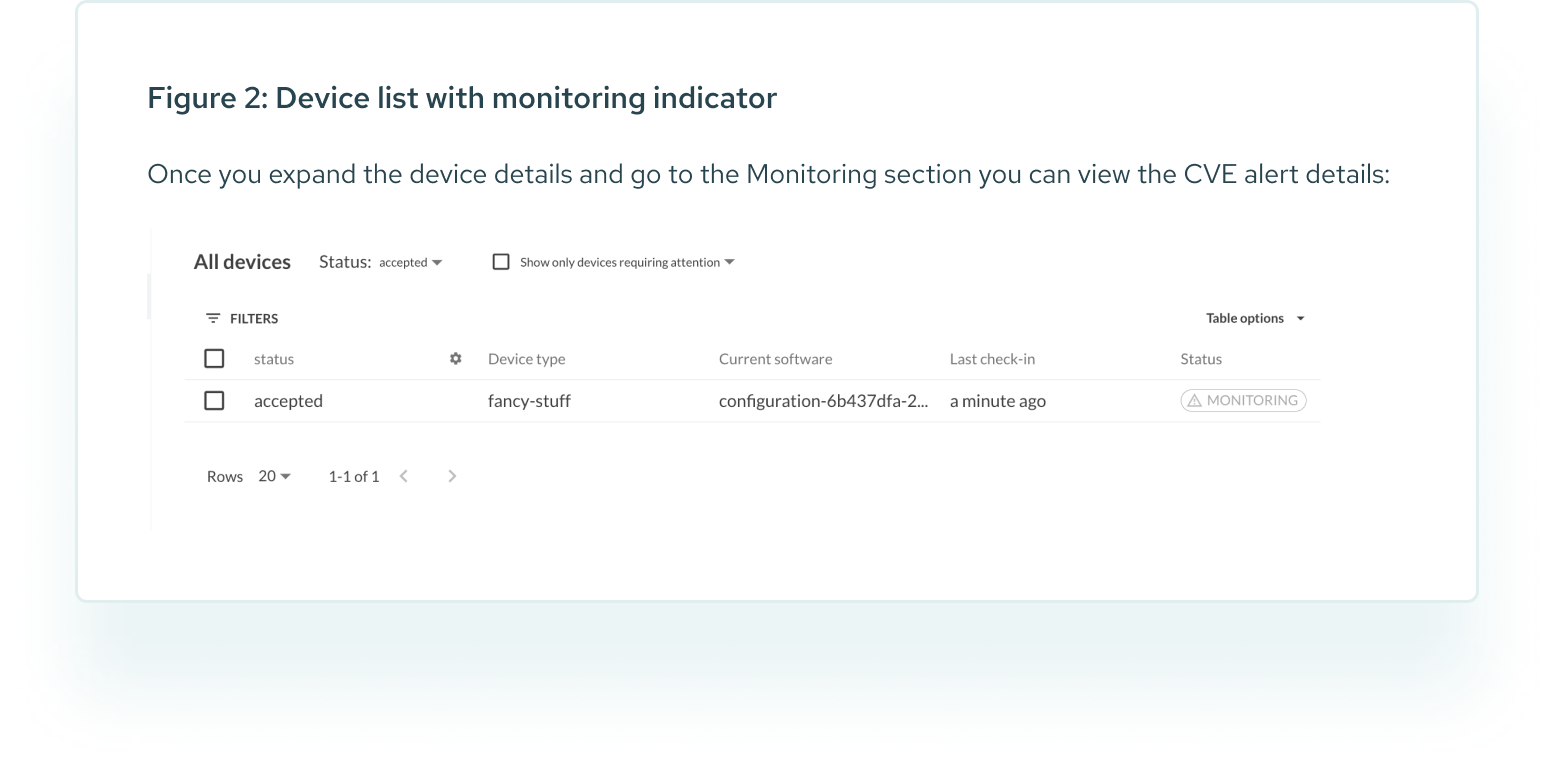
All we need to do now is to trigger a deployment. We can use the scheduled deployments (see image below), to set a date for the scan of your devices, and set the rollout pattern (if you choose not to run the scan on your whole fleet at once).
We will create one script which checks:
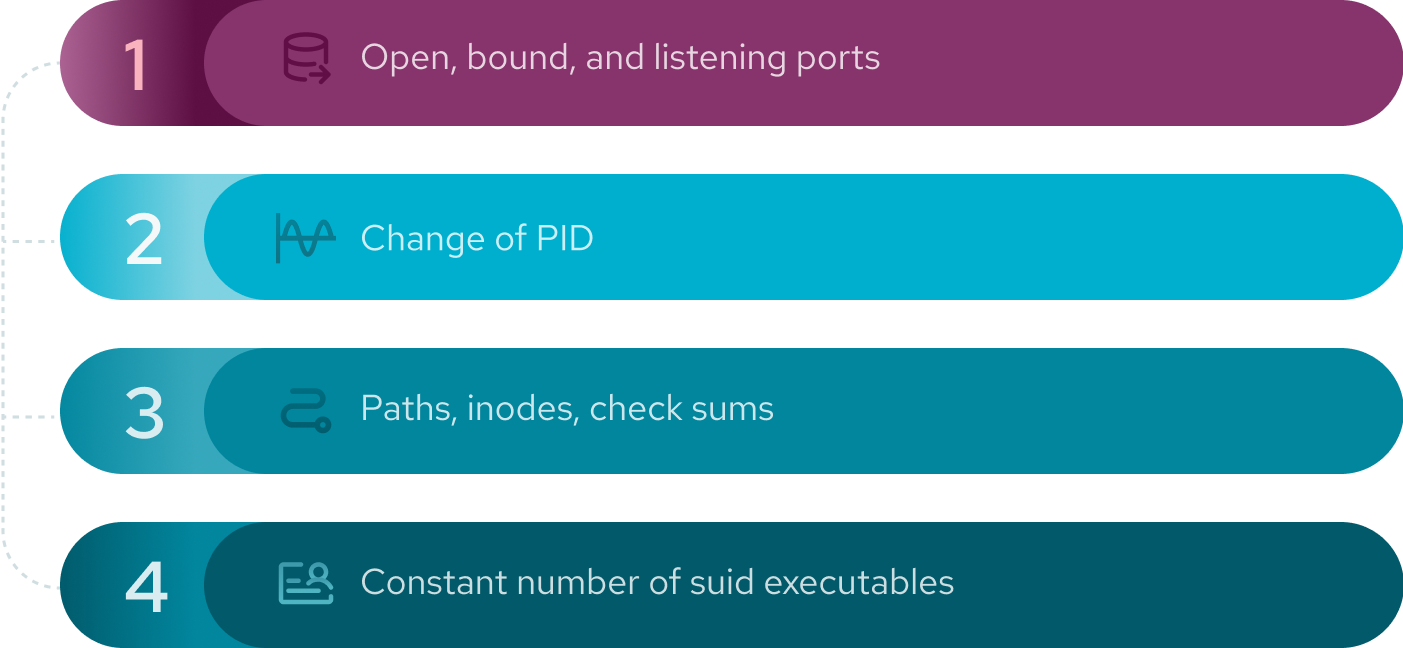
The above four are good choices as they are very simple probes (or do not take much CPU time) and can be gathered together to showcase the possibilities easily. They also serve as an example of one way of implementing the sweep, and therefore we will leave the implementation of the rest of the cases to the interested reader.
The check revolves around emitting a line containing a certain pattern every time there is a cause for an alert, while storing the state to be sure to report the critical state only once when it appears. Please also note that we have implemented the simplest possible solution: we do not check which process opened a port, and we have left out some implementation details such as enabling and disabling of the sweep or the issue of possible initial alerts after a software update.
where we assume that you have placed sweep.sh in /usr/local/bin/sweep.sh.
After you enable the check with the command above, Mender Monitor will start /usr/local/bin/sweep.sh and continuously look for the lines containing the "Sweep Scan CRITICAL:" pattern and send alerts if it appears.
The remaining four scenarios we will not present in detail as you can implement them based on what we already have discussed:
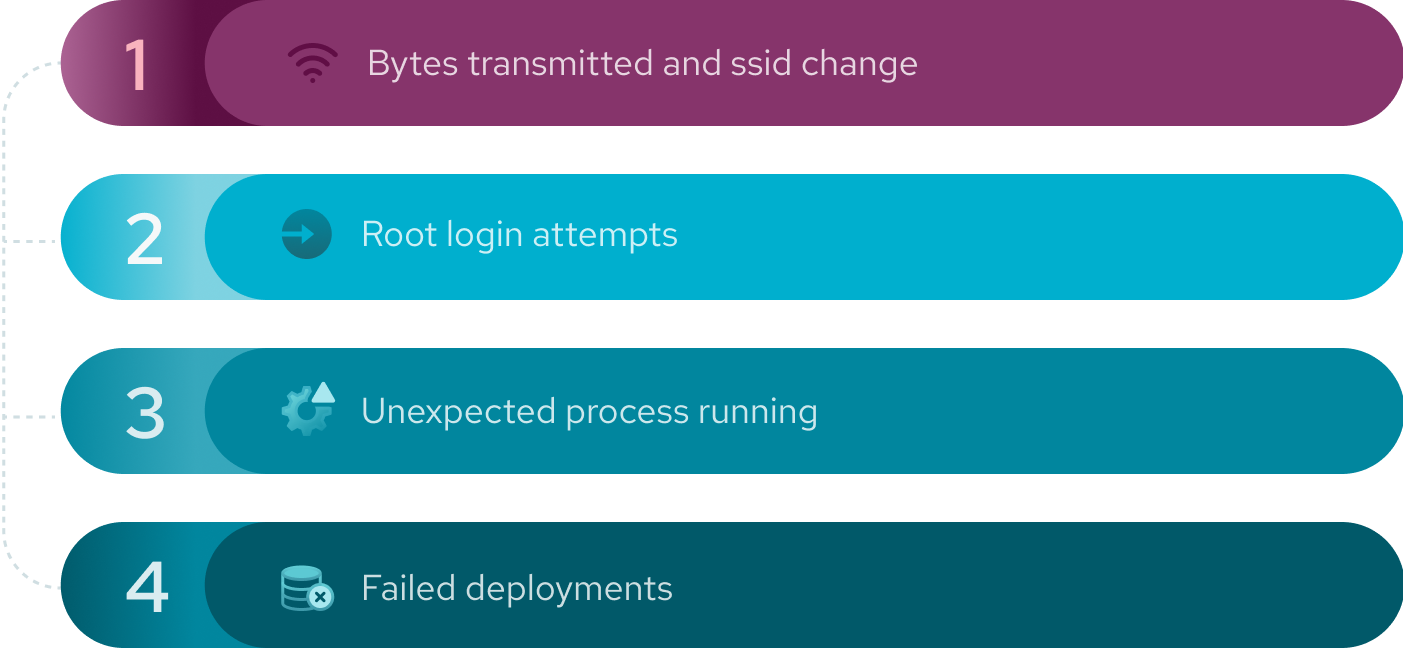
Instead, we will give a brief overview of the most feasible approaches.
The number of bytes transmitted over a given interface and ssid change is an exercise in parsing (for instance) ifconfig or iwconfig output and tracking TX, RX, and ESSID fields and emitting a log line triggering an alert.
For the root logins attempts via or all you need to do is to configure checks to look for certain patterns in logs:
The failed deployments you can check either by parsing the Mender Client logs via log subsystem with a certain pattern and @journalctl -u mender-client -f or by looking at /var/lib/mender/deployments.*log files in a similar way.
When it comes to monitoring running processes you can always use the above approach and run ps, top , or scan/proc file system. Those methods will work, but not always. Assume that there is something wrong on your device, and that the attacker used some techniques to hide the process from the listing, or the malicious executable was visible only for a brief moment, too short for the good old while [ 1 ]; do ps axuw; sleep 1; done; to notice. In that case we can try to use the excellent Extended Berkeley Packet Filter way of detecting what is happening on your system. For instance and provided you have kprobes enabled, you can create the following script:
It will detect any fork from any command, and print its name. Together with:
You can use it to detect execution (since it does fork).
We have presented a simple solution to a general security sweep problem. It is simple, but you can easily extend it. At every step you have a number of possibilities, for instance: mender artifact can carry additional metadata fields exposed later to the configuration update module, Mender Monitor has an extensive interface of bash functions via which you can control the alerts, and you have state scripts and update control maps at your disposal.
Alerts on reboot/restart
The sweep.sh script does not take into account the restarts of the mender-monitor or reboots on the device. This needs some attention, as we need to restart and update in a controlled manner, otherwise there will be an initial wave of alerts. There is a number of ways to go about it: disable the sweep with Configure add-on, or save the state on persistent storage of any sort.
Reaction system
Once we know that something is not how it should be, we can think of reacting. The main design principle behind Mender Monitor is to use the so- called “edge processing“ so as to let the device decide if a condition is critical or not. If so, why not let the device take action? This is obviously beyond the scope of the present topic, but can be the next logical step.
Active guard
With the dawn of the new generation of malware like OrBit we can think of a new generation of active guarding software. If an exploit interferes with the execution flow modifying the loader in memory or injecting libraries via LD_PRELOAD, we can try to monitor that and inject counter code.
Further integrations
All the functionalities of Mender are accessible via APIs. If for some reason the REST or D-Bus interface is not present (as it is in case of Mender Monitor add-on). There exists a library of shell functions. You can use them to fully integrate with your own product, and together with the Mender Monitor D-Bus subsystem sky is the limit.
Does the story end here?
Far from it. Ensuring the security of a remote, isolated device with no secure channel or physical access is a real challenge. Consider the check on file checksums and inodes described in the section above. The moment the list of paths, locations, and sha256sums land on a device storage, then all kinds of problems can occur. For example, a malicious actor could hijack and edit the file before you even notice and have a chance to prevent it. Once you try to mitigate against this by encrypting, another question rises: Where to store the private key? As soon as you find an answer to that with the use of a Hardware Security Module (HSM), someone asks: what about local users accessing the file? There is an answer to that as well: use AppArmour or SELinux and restrict the file permissions so that only one process can access it. But then what if someone gains root access? How can you securely enforce the policies? And before you think of an answer there is more: what if someone accesses the device physically, opens and gets the storage out? What if they can reboot it or mangle with the boot sequence, kernel and modules? The good news is that you are not defenseless: disc encryption facilitated by HSM and Secure Boot can come to the rescue.
In a similar manner you could point out weaknesses in all the above monitoring scenarios. Technically all of that is doable, but the to-do list will be rather lengthy, and the number of things that can go wrong is no shorter. Keep in mind that you may need to renew your helicopter pilot license and pay for gas in order to reach a device if you need to press 'enter' on the grub boot prompt to make the device continue to boot. And by then, your project may have already sold millions of devices to people and places around the world!
7. Conclusion: this is only the end of the beginning
What we have presented is not the end, it is only the beginning. It is the start of a journey that can be as challenging as it is interesting and rewarding. The above solution does not make your device hardened against all there is out there, but it can make you aware that there may be a problem unraveling. Was the world a better, happier place thirty years ago? Perhaps. Was the world simpler before the Magellan's expedition? For sure, it seemed smaller. Today's world and possibilities seem unlimited and the acceleration of progress unstoppable. The world has not become bigger, or more evil; it has become connected, and wherever connectivity comes, the security closely follows.
While Isaac Asimov was dying in 1992 writing his last book where he described the passing away of his “alter ego” Hari Seldon, he left a message of hope for better times. With Mender, we are creating a project that brings a new value to the security of devices and well-being of their users, customers, and vendors.


Securing remote diagnostics: Safe, reliable software updates for medical imaging hardware

Build or buy: Defining a secure & robust software update infrastructure